How to install L2 Switch in GNS3 Easy 10 steps guide
When you doing your CCNA or CCNP security lab practicals, you
better have a network switch to get hands-on experience to configure
such a thing as port-security. The simplest methodology to do labs
is to buy a used switch from Amazon because brand new Cisco switches may expensive or you don't
have an extra income to practice academics when you have a high cost
of living.

Perhaps, if you buy a switch, you will do the lab, then you never use the switch for a longer time or lay it on the desk till your next certification. To reduce or save you money, you can use software like GNS3 or Packet Tracer to implement the lab and do practicals. You can save your money, you can use it from anywhere you go, No warranty expiration or software crashes happen for the switch due to you use virtual switch installed in your laptop. Let's see how to install a layer 2 switch in GNS3 to pass CCNA Security certification.
PREREQUISITES
- Laptop or PC (3-4 GB RAM is recommended. Here I used Windows 10 Pro 64-bit)
- GNS3, GNS3 VM, and Virtual Box (GNS3 and VM versions should be matched)
STEP1: Install GNS3 emulation software in your HDD and start it as run as Administrator.
STEP2: Install Virtual Box and run it as Administrator.
STEP3: Double click on the GNS3 VM file to install the VM in the virtual box and make the settings as the following configuration for the network adapter. Start the GNS3 VM.

STEP4: GNS3 -> Preference -> GNS3 Server -> Local Server (Host binding: Use the IP address which you have configured the IP address for the VirtualBox Host-Only Ethernet Adapter)

STEP5: GNS3 -> Preference -> GNS3 Server -> Remote Servers (Note the IP address and the port, let's discuss these IP addresses in next step)

STEP6: Now you can see, the GNS3 VM is started as we have done in STEP3. Note the information which appeared in the console. "http://192.168.56.101:8000/upload" This is the path you have to upload the IOU image file for L2/L3 Cisco switches. The 192.168.56.0/24 IP range has come with its default configuration. Hence, I have pre-configured the local server IP (VirtualBox Host-Only Ethernet Adapter) and 192.168.56.0/24 IP address.

STEP7: Upload the image file. Open up the IE and paster the URL and press enter. You can browse your HDD and upload the image files. Note CiscoIOUKeygen.py This is the file to get the IOU license key for the switch image. Process STEP8 and run the python to generate the license key.

STEP8: Generating the IOU license. You can see gns3-iouvm = phrase in the middle of the console. Copy the command and paste in a text editor and create the license text file (IOURC.txt). Move the text file into the Virtual Box VM, GNS3 VM location.

STEP9: Upload the license key into GNS3

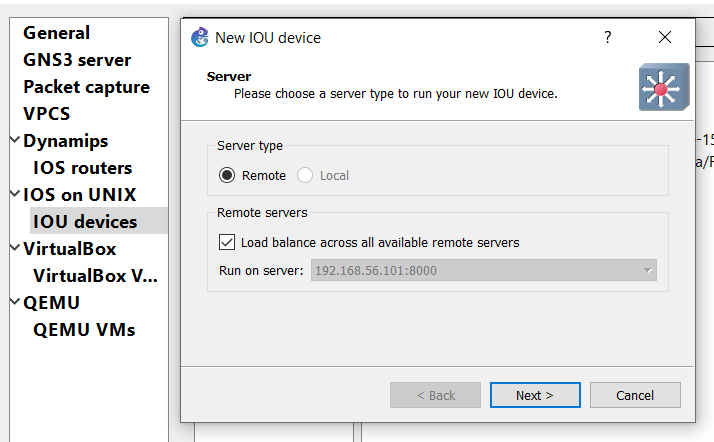
STEP10: Adding the image file and test the configuration in the L2 switch. In the IOU devices tab, note the below setting and click Next to proceed. Then you can see the Browse button is hidden to upload the IOU image. Note the STEP7. Load the IE and copy the text which mentioned as the image name .bin file /home/gns3/GNS3/images/i86bi-linux-l2-adventerprise-15.1b.bin and paste it in the Brower textbox and click Finish.


Now you can successfully upload the image into GNS3 and install the L2 switch. Please don't hesitate to comment below if you have any questions or advanced techniques to implement L2/L3 switches.
Note: Please feel free to contact us, if you need any further
information.


root/cisco gns3 vm
ReplyDelete